
Nov 16, 2026 | 1528 words | 15 min read
9.3.1. PY: Logic and Modularity#
You are a junior engineer supporting two projects. A local farmer needs help determining whether an irrigation system is watering correctly, while a mission team needs to calculate the escape velocity required to leave a planet. You will develop one menu-driven Python program containing both engineering tools, analyze the organization and design of the program, and create a flowchart representing its program flow.
Required Files#
Download the Python template
ENGR131_Python_Template.pyand save it as 9_3_1_username.py.Download the
report template, complete it, and save it as 9_3_1_report_username.pdf.Create and save your program flowchart as a PDF or a PNG: 9_3_1_flowchart_username.pdf or 9_3_1_flowchart_username.png.
Quick Guide: Completing & Submitting Your Report as PDF
To complete your technical report, you must edit the provided Word template (.docx) and convert it to a PDF for final grading. Follow this simplified workflow:
Edit in Word: Download and open the
.docxtemplate in Microsoft Word. Avoid editing in web previewers or Google Docs, as they will corrupt your formulas and chart formatting.Save as PDF Only When Finished: Type your answers and copy any charts or images directly into the Word document, saving your progress frequently. Once your report is 100% complete, save or export the document as a PDF. (Do not convert to PDF early, as PDFs are static and cannot be edited!) Copy charts or images into the report and keep the originals in the workbook, since Gradescope grades the workbook.
Submit to Gradescope: Upload your finalized PDF and any other required deliverables to the corresponding assignment in Gradescope. Always review your uploaded files from the Gradescope confirmation screen to verify your work is complete.
Reminder
Rename your files with your Purdue username, replacing “template” in the filename. Then fill out any required information in the template such as student name, email, etc.
Task 1: A Field Engineer’s Toolkit#
Rather than developing two separate scripts, your supervisor has asked you to create a single command-line toolkit. When the program runs, it will present the user with a menu and route the user to the appropriate engineering tool based on their selection. The irrigation system check will use conditional logic to evaluate operating conditions, while the escape velocity calculator will use a sequence of engineering calculations to determine the required velocity.
Organize the program using user-defined functions so that each function performs a specific task. This modular structure will make the program easier to read, test, debug, and reuse.
Reminder
Review and reference the Python Style Guide to ensure your code follows the required formatting and documentation standards, including the use of clear and descriptive comments.
Irrigation System Check#
Create a user-defined function that collects information about the irrigation system, validates the inputs, and displays an operating recommendation.
User Input#
Prompt the user to enter:
soil moisture as a percentage from 0 to 60,
forecasted rain in millimeters from 0 to 50,
whether the system is experiencing low pressure, and
whether the system requires maintenance.
Use the following prompts:
Enter soil moisture (%, 0-60):
Enter forecasted rain (mm, 0-50):
Is the system experiencing low pressure? (yes/no):
Is maintenance needed? (yes/no):
Convert the soil moisture and forecasted rain inputs to float values. Format the two yes/no responses using the appropriate string methods so that differences in capitalization or extra spaces do not affect the program.
Input Validation#
Validate the inputs before evaluating the irrigation conditions.
If either numeric input is outside its expected range, display a warning message and use
returnto end the function early.Convert each valid yes/no response to a Boolean value. Assign
Truewhen the response isyesandFalsewhen the response isno. If the user enters any other response, display a warning and assignFalse.
Irrigation Recommendation#
Evaluate the conditions in the order shown below. Once a condition is satisfied, display the corresponding recommendation.
Priority |
Condition |
Recommendation |
|---|---|---|
1 |
Maintenance is required |
|
2 |
The system is experiencing low pressure |
|
3 |
Forecasted rain is at least 10 mm |
|
4 |
Soil moisture is less than 20% |
|
5 |
Soil moisture is between 20% and 25%, inclusive |
|
6 |
Soil moisture is greater than 25% |
|
Escape Velocity Calculator#
Create a user-defined function that prompts the user for information about a planet and calculates its escape velocity. Organize the calculations into separate user-defined functions.
User Input#
Prompt the user to enter:
the planet’s average density in \(\kilogram/\meter^3\), and
the planet’s radius in \(\meter\).
Use the following prompts:
Enter the density of the planet (kg/m^3):
Enter the radius of the planet (m):
Convert both inputs to float values.
Calculations#
Create separate user-defined functions for each calculation. Choose clear, descriptive names for the functions and their parameters.
Function Purpose |
Parameters |
Calculation |
Returned Value |
|---|---|---|---|
Calculate planet volume |
Radius |
\(V = \frac{4}{3}\pi r^3\) |
Planet volume |
Calculate planet mass |
Density and volume |
\(m = \rho V\) |
Planet mass |
Calculate escape velocity |
Mass and radius |
\(v_e = \sqrt{\frac{2Gm}{r}}\) |
Escape velocity |
In these equations:
\(r\) is the planet’s radius in meters,
\(\rho\) is the planet’s average density in \(\mathrm{kg/m^3}\),
\(V\) is the planet’s volume in \(\mathrm{m^3}\),
\(m\) is the planet’s mass in kilograms, and
\(G\) is the gravitational constant, \(6.6743 \times 10^{-11}\).
Import the math module. Use math.pi for \(\pi\) and math.sqrt() to calculate the square root. Each function must return its calculated value. Convert the radius from meters to kilometers before displaying the results. This can be done using division in Python.
The example flowchart below demonstrates how the escape velocity calculation can be divided among multiple user-defined functions. Each function performs one calculation and returns its result for use in the next calculation.
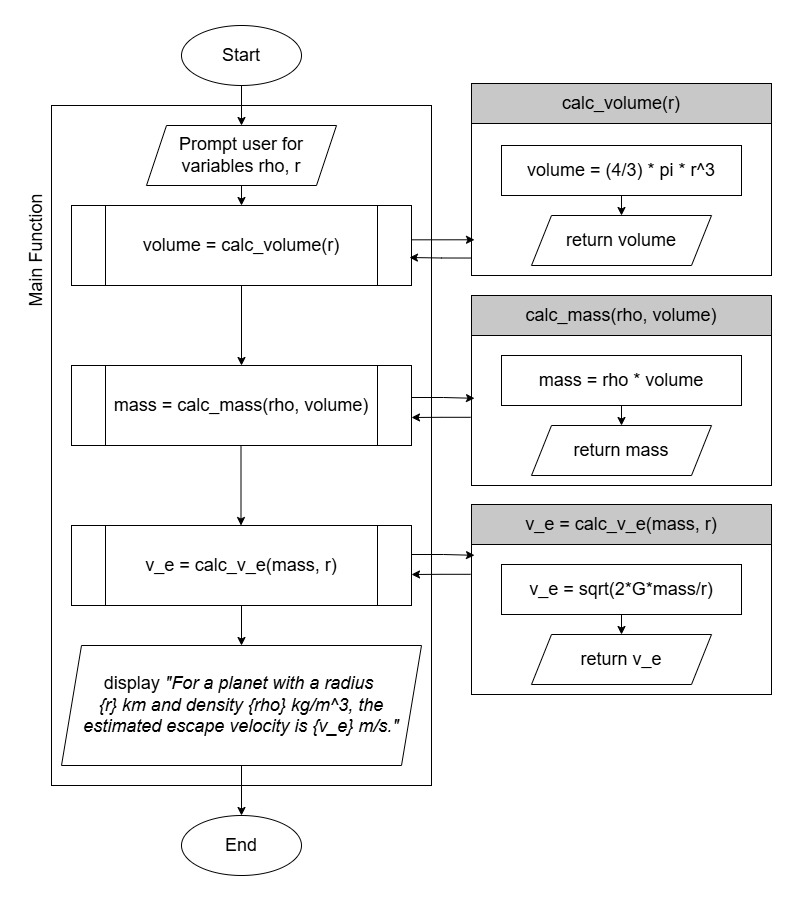
Fig. 9.1 Example organization of the escape velocity calculations using user-defined functions.#
Program Output#
Your final program output must:
display the menu and all required input prompts,
display the appropriate irrigation recommendation when the irrigation system check is selected,
display the planet’s radius in kilometers when the escape velocity calculator is selected,
display the escape velocity in meters per second,
format the radius and escape velocity to two decimal places, and
use clear labels and spacing for readability.
Use the sample output below to verify that your program produces the expected values and follows the required output format.
The meaning of each test input depends on the selected tool:
Menu Choice |
Tool |
Input 1 |
Input 2 |
Input 3 |
Input 4 |
|---|---|---|---|---|---|
|
Irrigation System Check |
Soil moisture (%) |
Forecasted rain (mm) |
Low pressure |
Maintenance required |
|
Escape Velocity Calculator |
Density (\(\kilogram/\meter^3\)) |
Radius (\(\meter\)) |
Not used |
Not used |
Sample Output#
Use the values in Table 9.7 below to test your program.
Case |
Menu choice |
Input 1 |
Input 2 |
Input 3 |
Input 4 |
|---|---|---|---|---|---|
1 |
1 |
15 |
0 |
no |
yes |
2 |
1 |
5 |
23 |
yes |
no |
3 |
1 |
15 |
23 |
no |
no |
4 |
1 |
15 |
0 |
no |
no |
5 |
2 |
5513.0 |
6371000 |
||
6 |
2 |
1879.8 |
2574730 |
Ensure your program’s output matches the provided samples exactly. This includes all characters, white space, and punctuation. In the samples, user input is highlighted like this for clarity, but your program should not highlight user input in this way.
Case 1 Sample Output
Case 2 Sample Output
Case 3 Sample Output
Case 4 Sample Output
Case 5 Sample Output
Case 6 Sample Output
Task 2: Program Analysis and Flowchart#
After completing and testing your Python program, analyze its organization and create a flowchart representing the complete program flow.
Program Analysis#
Complete the analysis questions in the report template downloaded from the Required Files section. Use specific examples from your program to support your responses and use clear, professional language.
Save the completed report as 9_3_1_report_username.pdf.
Program Flowchart#
Create a flowchart representing the complete program. The flowchart must include:
the menu and initial user selection,
the program path for each menu option,
the major validation and decision paths used by the irrigation system check,
each user-defined function call used by the escape velocity calculator, and
the values returned by the calculation functions.
We recommend using diagrams.net to create the flowchart.
Export the completed flowchart as a PDF or PNG using the flowchart filename specified in the Required Files section.
Gradescope Submission#
Save Deliverables: Ensure all required assignment files are saved and named exactly as specified in the assignment instructions. If a template file name contains the word
template, replace only that word with your Purdue username. When a task lists more than one deliverable, such as a workbook and a report, submit each deliverable to its own matching Gradescope assignment instead of combining them into one upload.Navigate to Gradescope: Log in to Gradescope. From your Dashboard, open the assignment.
Upload your work: Select the Upload submission method. Drag and drop all required files (or a compressed
.zipfolder) into Gradescope, and select Upload.Confirm Submission: When your upload is successful, you will see a confirmation message on your screen and receive an automated email receipt.
Add Team Members (if applicable): If this is a team assignment, add all team members to the submission. Each teammate should confirm they can see the submission in their own Gradescope account. For help, visit Gradescope’s documentation on adding team members.
Review Autograder Results: Wait a few minutes for the autograder to evaluate the relevant files. Scroll down to view any failed test cases. If you need assistance interpreting the output or errors, ask your teaching team.
Resubmit if Necessary: You can edit your files and select Resubmit as many times as you need before the assignment deadline. Only your final, active submission is graded. (Note: If you need to resubmit, you must upload all required files for the assignment again).
For a detailed walkthrough, review the official Gradescope Submission Guide.